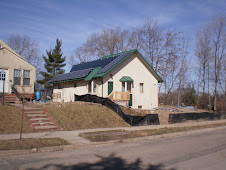
The solar panels are finally going on the roof, which was just finished last week. There are eight panels here, but there are supposed to be nine. Right now, nine don't fit. Unbelievable as it may seem, with all the planning that went into this roof design, and all the tens of thousands of dollars I've paid to designers, consultants, roof framers, and solar providers, my custom roof isn't the correct size for the solar panels it was designed for. I don't want to use this blog to name names and place blame, but I am extremely unhappy about this. How could this have happened? It's a custom designed roof!
I now realize why I couldn't find a builder to build this house. Builders who build houses have a limited number of plans they will use. They've made all the mistakes, and have these plans down pat. They won't deviate from them because too many things can go wrong, so they stick with what they know. I've tried to keep the negative out of this blog, but this is just one more thing in a long line of mistakes which have happened on this project. It's all a matter of people not paying attention to detail, and not double and triple checking figures. Unbelievable.
The problem is supposed to be fixed, so we'll see what happens. The mistake occured when we had 4 foot wide panels, and there is more space between the panels than the designer allowed for. Plus the roof framers were not given a figure that said, "you must allow this much room for the panels," so they took some liberties when framing the roof that took a few inches away, when there was absolutely no margin for error. This is my brother in his bobcat, backfilling the holes around the front window wells. It was supposed to rain, but luckily, it held off. A backhoe would have been better for this job, but the bobcat was free.
This is my brother in his bobcat, backfilling the holes around the front window wells. It was supposed to rain, but luckily, it held off. A backhoe would have been better for this job, but the bobcat was free.
 Here Cliff is taking out a little more of the side yard. I'll put a short retaining wall in along the property line with my neighbor. I had to bring the side yard down a bit when I realized the elevation on the drawings was incorrect and the tops of the basement windows were not at ground level, as the drawings showed, but a good two feet below ground level. I want light and air to get into the basement.
 You can see below where the retaining wall will be--off the to the left.
 Here's Cliff breaking up the driveway.
 All the asphalt is piled in front for now, and will all be recycled. Old asphalt is melted down and mixed with new. After all, asphalt is mostly pure petroleum, and doesn't deteriorate for hundreds of years.