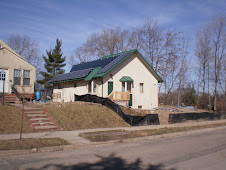
The problem with the roof and solar panels hasn’t been fixed yet, so I’m still unhappy with that. I’ve been assured this is going to be fixed, so stay tuned.
I’ve been away for the past two weeks on business, but was home for last weekend. My brother Cliff and his wife Rosa came over to the house for a few hours to help me with some landscaping. I have Cliff’s bobcat there temporarily. He moved some pallets and equipment around which were in the way, and finished filling in the place where the driveway had been. When my lot was adjoined to the Quinces’ lot next door, the owner put in a large horseshoe driveway which went around the perimeter of the property. I took out the part of the driveway which cut through my backyard, and will use what’s left of the driveway along the north side of the property. Part of the driveway was taken out when we dug the hole for the basement, and the asphalt driveway as a whole is not in that good of shape. It was old anyway, and all the heavy equipment on it didn’t help. But it is still a useable driveway, and eventually I’ll replace the asphalt with permeable pavers.
I’m told that Innovative Power Systems (IPS) is busy installing the solar apparatus in the basement mechanical room. The schedule for now is that Concrete Treatment, Inc. is polishing the basement cement floor. This will give it a finished look and make it much easier to keep clean. I’ll put area rugs on top in some places, I’m sure. But I won’t have the problem of stepping out of bed onto a cold cement floor, because the floor will always be warm in the winter, due to the radiant in-floor heating.
Once the basement floor is done (hopefully Monday or Tuesday), we will begin hanging the sheetrock. I originally was going to use magnesium oxide (MgO) board, which will not mold. There were a couple things that made me forgo the MgO board in favor of paperless sheetrock. The cost was the big item: MgO board costs about 4 times as much as conventional sheetrock. Although the U.S. has plenty of gypsum mines (that’s what sheetrock is made of), it has no magnesium oxide mines; they are all in Asia, mostly China. It’s not very “green” to use materials shipped halfway around the world. Instead, I’m using DensArmor, a paperless sheetrock. It’s the glue and cardboard that make conventional sheet rock undesirable, because the paper burns, grows mold, and it and the glue are food for bugs. DensArmor has a fiberglass mesh to hold it together instead of cardboard. It’s more expensive than conventional sheetrock, but I’d rather not have the VOCs from the glue, and the potential for mold.
Last weekend I finished filling in the north side of the house, where new window wells had been put in. One of the things that were left out of the building plans were the window wells. RockSolid Concrete put three cement window wells on the south side, but since they weren’t properly set on footings, they sank when the ground thawed (they were poured in the winter) and have pulled away from the house. Two of them aren’t too bad, but the third one has pulled away from the house quite a bit. RockSolid Concrete won’t fix them, and I won’t pay for them, so I guess I’m stuck with trying to fix the problem. The metal window wells on the north side, next to the driveway, look really good. Jeffrey Swainhart ordered them and installed them. They are close enough to the house to leave enough driveway there to use for my car. I built the house as far to the north as I could, to take advantage of the sun on the south side.
I’m still hoping to be able to get the house finished by the end of the summer. There are some big projects which still need to be done. I will be applying the clay plaster to the walls, and need to take a couple weeks vacation time to do that. The radiant in floor heating has yet to be installed on the first floor, mostly because the sheetrock hasn’t been hung yet. Once the sheetrock and floor are completed, we can start doing things like hanging doors, installing kitchen and bathroom cabinets, and doing the finishing work around the house. Although the house is wired and has plumbing installed, all the fixtures will need to be put in, and that can’t be done until the sheetrock and first floor are done. Nothing on the outside of the house is finished except the roof. The outside has to have stucco put on and I’m not sure how I’m going to finish the gables yet.
I’m hoping to accomplish a lot of landscaping this weekend. My sister Cathy, the landscape architect, is in town, staying with our mom while I’m away. I’ll have a full day with her to lay out the landscaping plan. I already bought quite a few plants, perennials, because the nursery’s stop selling things by the end of May. So I wanted to get my asparagus, fruit trees, raspberry canes, etc. before they disappeared, not to be seen until next spring. I have containers all over my mom’s yard and porch, full of plants. I’m hoping to get some of my plastic lumber soon and start laying out some raised beds. I still have a big pile of dirt in the back, but I think I can start putting some things in on the south side and work around the pile. Another thing to do that I have forgotten: I need to put a retaining wall along the south side, since I had to lower the elevation there. It’s about a two and a half foot drop from my neighbor’s yard. I lowered the elevation because the basement windows, which were supposed to be at ground level, are two feet below the ground.
More updating later…
Friday, June 5, 2009

Wednesday, April 29, 2009
Landscaping, Solar Panels
The solar panels are finally going on the roof, which was just finished last week. There are eight panels here, but there are supposed to be nine. Right now, nine don't fit. Unbelievable as it may seem, with all the planning that went into this roof design, and all the tens of thousands of dollars I've paid to designers, consultants, roof framers, and solar providers, my custom roof isn't the correct size for the solar panels it was designed for. I don't want to use this blog to name names and place blame, but I am extremely unhappy about this. How could this have happened? It's a custom designed roof!
I now realize why I couldn't find a builder to build this house. Builders who build houses have a limited number of plans they will use. They've made all the mistakes, and have these plans down pat. They won't deviate from them because too many things can go wrong, so they stick with what they know. I've tried to keep the negative out of this blog, but this is just one more thing in a long line of mistakes which have happened on this project. It's all a matter of people not paying attention to detail, and not double and triple checking figures. Unbelievable.
The problem is supposed to be fixed, so we'll see what happens. The mistake occured when we had 4 foot wide panels, and there is more space between the panels than the designer allowed for. Plus the roof framers were not given a figure that said, "you must allow this much room for the panels," so they took some liberties when framing the roof that took a few inches away, when there was absolutely no margin for error. This is my brother in his bobcat, backfilling the holes around the front window wells. It was supposed to rain, but luckily, it held off. A backhoe would have been better for this job, but the bobcat was free.
This is my brother in his bobcat, backfilling the holes around the front window wells. It was supposed to rain, but luckily, it held off. A backhoe would have been better for this job, but the bobcat was free.
 Here Cliff is taking out a little more of the side yard. I'll put a short retaining wall in along the property line with my neighbor. I had to bring the side yard down a bit when I realized the elevation on the drawings was incorrect and the tops of the basement windows were not at ground level, as the drawings showed, but a good two feet below ground level. I want light and air to get into the basement.
 You can see below where the retaining wall will be--off the to the left.
 Here's Cliff breaking up the driveway.
 All the asphalt is piled in front for now, and will all be recycled. Old asphalt is melted down and mixed with new. After all, asphalt is mostly pure petroleum, and doesn't deteriorate for hundreds of years.
Thursday, April 23, 2009
New Roof, Masonry in Front, Interior Wall Work
My green roof is nearly completed. A close up where you can see the seams. The solar panels will be clipped to the seams.
 This is how the roof was delivered.
 Parging the inside of the exterior walls. A brown coat of cement was applied to seal the walls and provide a smooth surface for the clay plaster. You can see the obvious difference when the Faswall blocks are covered.
 The front walls nearly completed.
 Below, the walls and window wells are complete except for the porch under the door. I need to fill in the part under the door with dirt, halfway up, to provide stability before Eberhard puts the cap (front porch) on the top to complete it.
 Eberhard Construction put in a small retaining wall to hold the hill up to the front door, and put in one large window well in front of the two front basement windows. Eberhard had a great crew and did a very professional job.
 Here, the blocks were delivered and readied for the walls.

 A close up where you can see the seams. The solar panels will be clipped to the seams.
 This is how the roof was delivered.
 Parging the inside of the exterior walls. A brown coat of cement was applied to seal the walls and provide a smooth surface for the clay plaster. You can see the obvious difference when the Faswall blocks are covered.
 The front walls nearly completed.
 Below, the walls and window wells are complete except for the porch under the door. I need to fill in the part under the door with dirt, halfway up, to provide stability before Eberhard puts the cap (front porch) on the top to complete it.
 Eberhard Construction put in a small retaining wall to hold the hill up to the front door, and put in one large window well in front of the two front basement windows. Eberhard had a great crew and did a very professional job.
 Here, the blocks were delivered and readied for the walls.
Wednesday, April 1, 2009
Windows, Interior Framing Complete
Here is the view from the basement bay window. To the right in the middle window, you can see the black silt fence in front. The pile of dirt to the left of that will be no higher than the top of the silt , so there will be a lot of light coming in from the front. This is why I wanted the hill dug out in front, to expose the windows in front. I have been living in a basement with tiny windows for the past four years, and will be in heaven when I will have natural light and be able to OPEN the windows for fresh air. Mom will be living on the handicapped accessible first level.

This view shows the installed bay windows in front. The windows to the right of each are bedroom windows upstairs and downstairs.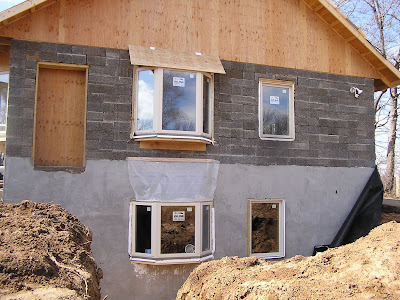 Below is my pride and joy, the cold room, which is along the back of the basement behind the laundry room. There are no heating tubes in the floor underneath, and the walls will be insulated. With no heat, and outside walls on 2 sides, I'm hoping to keep it under 60 degrees in the summer, and 45 to 50 degrees in the winter. I'll store root vegetables, squash, and apples there in the winter, as well as all my home canned goods.
 This is the view from the front of the basement to the rear, looking through the bathroom and laundry room to the cold room. The black pipes are the plumbing. You can see that there is a lot of natural light coming into the basement.
 Below are the two large heat storage tanks for the solar heat. Innovative Power Systems (IPS) is ready to start installing the solar heating system, but we still have to do some work on the inside, and the metal roof needs to go on. The roofer was supposed to start a month ago, but has come up with various excuses for the delay, which I'm not happy about. Hopefully, we'll have a roof (and it's GREEN, for the green house) in the next two weeks.
 Here, you can see the upstairs front bedroom framed in, looking through the kitchen and dining room.
 Below, the basement bedroom framed in. This photo doesn't show it, but the windows have been put in and let in just as much light as if it was above ground.
 I thought I had more up-to-date photos, but I found I didn't, so I'll take some more this weekend. Most of the rough-ins have been done for the electric, the air exchange system and AC, and the plumbing.
 Below is my pride and joy, the cold room, which is along the back of the basement behind the laundry room. There are no heating tubes in the floor underneath, and the walls will be insulated. With no heat, and outside walls on 2 sides, I'm hoping to keep it under 60 degrees in the summer, and 45 to 50 degrees in the winter. I'll store root vegetables, squash, and apples there in the winter, as well as all my home canned goods.
 This is the view from the front of the basement to the rear, looking through the bathroom and laundry room to the cold room. The black pipes are the plumbing. You can see that there is a lot of natural light coming into the basement.
 Below are the two large heat storage tanks for the solar heat. Innovative Power Systems (IPS) is ready to start installing the solar heating system, but we still have to do some work on the inside, and the metal roof needs to go on. The roofer was supposed to start a month ago, but has come up with various excuses for the delay, which I'm not happy about. Hopefully, we'll have a roof (and it's GREEN, for the green house) in the next two weeks.
 Here, you can see the upstairs front bedroom framed in, looking through the kitchen and dining room.
 Below, the basement bedroom framed in. This photo doesn't show it, but the windows have been put in and let in just as much light as if it was above ground.
 I thought I had more up-to-date photos, but I found I didn't, so I'll take some more this weekend. Most of the rough-ins have been done for the electric, the air exchange system and AC, and the plumbing.
 Today, Jeffrey picked up a small electric cement mixer I had bought. Devin, my neighbor, is going to do the majority of the parging of the interior walls, which has to be completed before I can apply the clay plaster. It's a hard, messy job. The parging is just a thin application of cement to smooth out the walls and fill in the holes in the surface of the FasWall. Because it is cement with a rough surface, the clay plaster can be applied directly to it. If I used the plaster on the interior wallboard walls, I'd have to apply a special sandy surface first to get the clay to stick to the sheet rock. I will probably paint the interior walls, and just have the clay plaster on the interior of the outside walls. Clay plaster is expensive, and a lot of work to apply.
We are planning on having the rough-in inspections next week for the electric, plumbing, HVAC, and framing. After that, we'll get the sheet rock hung, and then finish the first floor radiant infloor heating installation.
Sunday, February 22, 2009
Radiant Tubing, Basement Floor, Upstairs Framing
After making some changes in the contracting, progress is being made. Jeffrey Swainhart of Swainhart Construction Services has been my right hand man on this project, and he has lined up some great contractors to finish this project. Lon Lichliter of Lichliter Plumbing has the plumbing roughed in, and Gardner Construction stepped in to pour the basement floor and will be doing some other work on the outside. White Bear Mechanical has started installing the radiant infloor heating. The two pictures below show the plumbing rough-in.

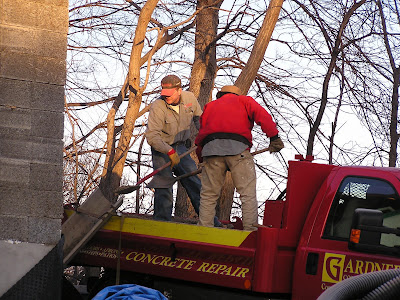
 The two guys in the picture above are from Gardner Construction. I'm facing the rear of the house, where the bathroom and laundry room will be. The plumbing is there, and the guys are preparing the basement floor for a gravel bed. The truck below is full of gravel.
 The guys are shoveling the gravel down a chute through the basement window.
 After the gravel was put down, 4" foam insulation was laid down on top.
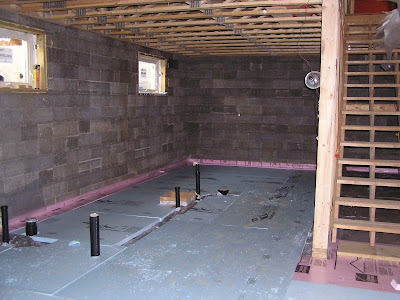 The foam floor and the temporary propane furnace above it.
 The tubing in the front basement bedroom.
 All the tubes are hooked up to a central point. There will be two heating zones in the basement, and two or three upstairs (I can't recall right now).
 This shows the north side of the basement, looking to the front bedroom.
 The family room in the basement.
 The upstairs bathroom framed in.
 The front upstairs bedroom framed in.
 The concrete floor poured in the basement, covering up the tubes. This view is from the front south side, looking back through the bathroom to the laundry room. The "cold room" for storing canned goods and produce from the garden, will be at the very rear and under the steps. There are no tubes in the concrete floor where the cold room will be.
 Below is the other side (north) of the basement, looking to the rear. There will be quite a large mechanical room there, which will hold the boiler, hot water heater, and the two 200 gallon tanks. The tanks will store heat from the solar heating panels on the roof.
 Below, I'm standing at the rear of the mechanical room looking east, to the front of the house.
 Here are the ends of the tubes, with the rest buried in concrete. The tubes were tested for 48 hours with high pressure to make sure there where no leaks (this was before the concrete was poured, of course).
 The next step will be repeating this process of laying tubing upstairs, after the framing upstairs is completed, which should be this week. A type of gypsum floor underlayment, Gyp-Crete, will be poured on top of the tubing upstairs, and then a finished floor (bamboo, most likely), will be installed on top of the tubes.

 The two guys in the picture above are from Gardner Construction. I'm facing the rear of the house, where the bathroom and laundry room will be. The plumbing is there, and the guys are preparing the basement floor for a gravel bed. The truck below is full of gravel.
 The guys are shoveling the gravel down a chute through the basement window.
 After the gravel was put down, 4" foam insulation was laid down on top.
 The foam floor and the temporary propane furnace above it.
 The tubing in the front basement bedroom.
 All the tubes are hooked up to a central point. There will be two heating zones in the basement, and two or three upstairs (I can't recall right now).
 This shows the north side of the basement, looking to the front bedroom.
 The family room in the basement.
 The upstairs bathroom framed in.
 The front upstairs bedroom framed in.
 The concrete floor poured in the basement, covering up the tubes. This view is from the front south side, looking back through the bathroom to the laundry room. The "cold room" for storing canned goods and produce from the garden, will be at the very rear and under the steps. There are no tubes in the concrete floor where the cold room will be.
 Below is the other side (north) of the basement, looking to the rear. There will be quite a large mechanical room there, which will hold the boiler, hot water heater, and the two 200 gallon tanks. The tanks will store heat from the solar heating panels on the roof.
 Below, I'm standing at the rear of the mechanical room looking east, to the front of the house.
 Here are the ends of the tubes, with the rest buried in concrete. The tubes were tested for 48 hours with high pressure to make sure there where no leaks (this was before the concrete was poured, of course).
 The next step will be repeating this process of laying tubing upstairs, after the framing upstairs is completed, which should be this week. A type of gypsum floor underlayment, Gyp-Crete, will be poured on top of the tubing upstairs, and then a finished floor (bamboo, most likely), will be installed on top of the tubes.
Saturday, January 31, 2009
January Progress
January was a long month. I had problems with contractors and contracts and I was pretty discouraged for a while. But I think Jeffrey and I have things pretty much figured out, and we have a schedule for getting the rest of the work done. Here it is February, and the house is still not closed in, which is frustrating. Although many things have held the project up, the weather has been the worst single factor for the past six weeks. It has just been too cold to do a lot of the work to close the house up. In spite of the cold, though, the skylights were put in the last week in December, and most of the windows are in. The front has no windows installed yet, but that is because the front of the house hasn't been backfilled and there are forms in place for concrete for the front window wells and retaining wall. It's been too cold to pour concrete. The forms are interfering with the ability to use ladders to assist in installing the windows on the main floor, since it's a second story in front. I'm also very hesitant to put a bay window in where concrete is going to be poured and large metal forms will have to be removed after the pour. Having a large expanse of glass only a foot or so away from a pour boom and the metal forms just doesn't seem like a good idea. We'll get the windows in when there is no danger of them getting smashed by equipment.
The next three pictures show the skylights being put into the roof. The three 3' by 4' skylights are in the roof above the stairs to the basement. These will let natural light into the center of the house, and interior windows in the stairwell walls will let that light into the kitchen, living room, and bedroom. The center skylight is operable, so I will be able to open it and a fan in the stairwell will draw warm air up the stairwell and will vent it out the roof, acting like a whole house fan.
 Here's Jeff cutting out the roof to put in one of the skylights. The roof framers, Jim Klem Construction, did a very professional job in putting on the roof, and made it easy for Jeff to cut the opening for the skylights. Not a good shot, but below is Jeffrey and Devin (shown) placing the skylight into the framed opening.
 Jeffrey and Devin from a distance.
 One of the skylights in place.
 A view towards downtown Minneapolis. Almost exactly in the center of the picture, you can barely see one building in the skyline. The rest of the skyline is behind the two pine trees on the left side.
 Heidi and Devin's chicken coop, next to their garage.
 A view from the roof to the west. The big pile of dirt is there to backfill the north side of the house, which is still all dug out waiting for forms for concrete window wells.
 The temporary propane furnace hanging from the ceiling (so the floor can be finished) in the basement. It thawed out the basement floor and the plumbing has been roughed in. Jeffrey is going to get the basement floor insulation in this week, and then White Bear Mechanical will come and set the tubes for the radiant in floor heating. Hopefully, the concrete floor for the basement will get poured by the end of next week (by Friday the 13th)
 Here are the windows on the north side. The kitchen is to the right (rear), the dining room window in the middle, and the guest bedroom/office window in front.
 The rear (west side) of the house. The two windows on the right are the master bedroom windows. The double-hung window on the left is in the kitchen.

The next three pictures show the skylights being put into the roof. The three 3' by 4' skylights are in the roof above the stairs to the basement. These will let natural light into the center of the house, and interior windows in the stairwell walls will let that light into the kitchen, living room, and bedroom. The center skylight is operable, so I will be able to open it and a fan in the stairwell will draw warm air up the stairwell and will vent it out the roof, acting like a whole house fan.
 Here's Jeff cutting out the roof to put in one of the skylights. The roof framers, Jim Klem Construction, did a very professional job in putting on the roof, and made it easy for Jeff to cut the opening for the skylights. Not a good shot, but below is Jeffrey and Devin (shown) placing the skylight into the framed opening.
 Jeffrey and Devin from a distance.
 One of the skylights in place.
 A view towards downtown Minneapolis. Almost exactly in the center of the picture, you can barely see one building in the skyline. The rest of the skyline is behind the two pine trees on the left side.
 Heidi and Devin's chicken coop, next to their garage.
 A view from the roof to the west. The big pile of dirt is there to backfill the north side of the house, which is still all dug out waiting for forms for concrete window wells.
 The temporary propane furnace hanging from the ceiling (so the floor can be finished) in the basement. It thawed out the basement floor and the plumbing has been roughed in. Jeffrey is going to get the basement floor insulation in this week, and then White Bear Mechanical will come and set the tubes for the radiant in floor heating. Hopefully, the concrete floor for the basement will get poured by the end of next week (by Friday the 13th)
 Here are the windows on the north side. The kitchen is to the right (rear), the dining room window in the middle, and the guest bedroom/office window in front.
 The rear (west side) of the house. The two windows on the right are the master bedroom windows. The double-hung window on the left is in the kitchen.
Tuesday, December 30, 2008
Not Much Progress During the Holidays
The pace of this project has been slower than I ever could have imagined. From when this project started in August, I would guess that I've averaged one full workday per week of actual work from my contractors. Every week, I've gotten promises on what is going to be accomplished, and most of the time it doesn't happen anywhere near the timeframe I was given. I don't understand the contractor mentality. I've heard the same story from every single person I've spoken to: contractors NEVER do what they say they're going to do when they say they're going to do it. Period.
Jeffrey made a door jam for my back door, the one I bought last winter at the ReUse Center. I bought the door for $100. I didn't realize what a good deal I had gotten until I priced entry doors. Entry doors with glass windows, especially fancy ones like this one, cost around $2000 new. It's perfect for the back door, as the stair tower is designed to let in a maximum amount of light. Here it is:
 I didn't have my camera on site today, but Jeffrey and Devin have been busy putting in windows. The windows arrived on Monday, December 22nd. Jeffrey got them into the house, but the weather turned extremely cold (minus 19 on Tuesday), and it was just too cold to work outside. Then came the Christmas holiday weekend, which I didn't expect anyone to work on. But they got busy yesterday, and got 5 of the 19 windows in. They did a couple more today, and I think they are working tomorrow, also.
Joe Haaf of RockSolid Concrete has the basement floor covered with commercial electric blankets to get the basement floor thawed out. We need that done to get the floor leveled, a bed of sand put on top of the dirt, the pex tubing (for infloor radiant heat) set up, and the plumbing in before we can pour the basement floor.
First, though, the roof has to be finished. The roofers were supposed to put a waterproof covering on it last week, but it was too cold. This week, they gave their workers off. So we have to wait until next week to get the roof closed in. There are very large gaps everywhere due to the design of the roof, and even though we had tarps on it, it was letting in streams of water from the rain and melting snow last Saturday, when it was so warm out.
Everything is dependent on something else. The metal roof can't go on until the skylights go in. The solar panels can't go on until the metal roof is on. The basement floor can't be done until the house is closed up, which means the finished roof has to go on and the windows and doors all have to be in.
Joe is still working on the cement work as best he can in the winter. The three south window wells are done, and he's working on the front ones and the front retaining wall this week. It has to be above 10 degrees above zero to pour concrete, and it's supposed to be pretty cold this week.
Jeffrey made a door jam for my back door, the one I bought last winter at the ReUse Center. I bought the door for $100. I didn't realize what a good deal I had gotten until I priced entry doors. Entry doors with glass windows, especially fancy ones like this one, cost around $2000 new. It's perfect for the back door, as the stair tower is designed to let in a maximum amount of light. Here it is:
I didn't have my camera on site today, but Jeffrey and Devin have been busy putting in windows. The windows arrived on Monday, December 22nd. Jeffrey got them into the house, but the weather turned extremely cold (minus 19 on Tuesday), and it was just too cold to work outside. Then came the Christmas holiday weekend, which I didn't expect anyone to work on. But they got busy yesterday, and got 5 of the 19 windows in. They did a couple more today, and I think they are working tomorrow, also.Joe Haaf of RockSolid Concrete has the basement floor covered with commercial electric blankets to get the basement floor thawed out. We need that done to get the floor leveled, a bed of sand put on top of the dirt, the pex tubing (for infloor radiant heat) set up, and the plumbing in before we can pour the basement floor.
First, though, the roof has to be finished. The roofers were supposed to put a waterproof covering on it last week, but it was too cold. This week, they gave their workers off. So we have to wait until next week to get the roof closed in. There are very large gaps everywhere due to the design of the roof, and even though we had tarps on it, it was letting in streams of water from the rain and melting snow last Saturday, when it was so warm out.
Everything is dependent on something else. The metal roof can't go on until the skylights go in. The solar panels can't go on until the metal roof is on. The basement floor can't be done until the house is closed up, which means the finished roof has to go on and the windows and doors all have to be in.
Joe is still working on the cement work as best he can in the winter. The three south window wells are done, and he's working on the front ones and the front retaining wall this week. It has to be above 10 degrees above zero to pour concrete, and it's supposed to be pretty cold this week.
Subscribe to:
Posts (Atom)